


The recent upgrade Claris FileMaker introduced transactions.
FileMaker has, until now, only been able to commit one data record at a time. In a relational database this “per record” approach has drawbacks. When we do something complex we may create several records, or create records in several different tables. Using FileMaker’s “per record” approach, each of these records would be committed to the database as we go. And if a problem occurs, we then have to undo each of those operations.
Undoing multiple operations is not difficult but you have to know how and when to do it. Obviously, fixing things immediately is the best course of action. But what if the issue occurred because of a network failure? In that case, we may have committed some new records to the database, not all of them. And the problem is that we are no longer connected to the database so it is not possible to undo the actions. The database now has a bad data set, its records are incomplete, and we have no way to correct that.
Assuming that the network error only lasted a second –just long enough to cause a problem– we now have to go back and clean up. Again, this can be done, but it can be hard to get right. You need a good developer to manage this sort of behaviour.
In a system that implements transactions this issue disappears. We start by initiating a transaction. As we perform our complex task the data is stored in memory. Until we commit a transaction nothing has been saved to the database. At that point, everything gets committed. Now, if we have a network interruption then we have lost a little work. Just as we lost some work previously. More importantly, the database has not been modified, so it has an accurate and complete data set. There is nothing to clean up. All that needs to be done is to alert the user.
Having the ability to commit a transaction, or revert a transaction simplifies the effort needed in scripting and in the structures we need to support the work. It’s a very welcome addition.
What has been introduced?
There are three new commands and a new Get function.
Open Transaction
Commit Transaction
Revert Transaction
Get(TransactionOpenState)
The new commands operate in a similar manner to If / Else / End If. Like those commands the Open / Revert / Commit commands are used together, they cannot be used by themselves. The Open Transaction and the Commit Transaction commands form a block. Any commands that you enter between them will be indented, to make it clear that you are operating in a special context. The Revert Transaction command can only be used within a transaction block. This is similar to the Else command which can only be used between If and End If.
How to use transactions in Claris FileMaker
There are a few quirks in the behaviour of transactions that are not fully explained in the documentation.
- The very first thing to understand is that the three script steps related to transactions must be used as a group. They do not stand alone. Open Transaction and Commit Transaction are a pair of commands that cannot be separated. You cannot open a transaction in one script and commit it in a separate script. When you create an Open Transaction command, the Commit Transaction command is immediately added. If you use a Revert Transaction script it must be used between Open Transaction and Commit Transaction.
- The second important feature is that all the commands related to the transaction must occur within the same window. Any actions taken in different windows from the window of the originating transaction will be committed automatically outside existing transactions. In other words, those actions are not part of the transaction. They are committed to the database on a per-record basis.
Open Transaction / Commit Transaction
Usage of the transaction commands is very simple. You insert the `Open Transaction` command. The `Commit Transaction` command is automatically added. Together they form a block which begins with Open and ends with Commit. Every command that you place between the Open and Commit commands will be bundled as a single transaction. If you modify a field, delete a record, or create several new records in a transaction the actions don’t occur straight away. The data changes are only made when the Commit command is successful. If the commit command is not successful, or if the revert command is called, then the modified data, record deletion, or record creation is cancelled and doesn’t occur at all
It’s important to note that the purpose of a transaction is ensure data integrity. Any command can appear in a transaction block. Commands like Go to Layout or Go to Record don’t affect the data, and they are performed normally. If you have switched layouts or modified the found set, those actions aren’t reversed. You’ll need to rewind those actions yourself.
Open Transaction
    Go to Related Record [ ]
    Delete All Records
    Revert Transaction [ Condition: "Get(LastError)" ; Error Code: 5001 ; Error Message: "Records were not deleted"]
Commit Transaction
If [ Get( LastError ) ]
    Go to Layout [ Original Layout ]
    beep
    Show Custom Dialog [ Get ( LastErrorDetail ) ]
End If
Revert Transaction – a bundle of tricks
Revert Transaction is a very compact and powerful script step. Called without any conditions or logic tests Revert Transaction will revert the transaction. Used in this way, it is a simple command, “Revert!” However, there are several options that change the behaviour of the command. For instance, it can be provided with an optional condition. When the condition is true, the command is performed, if the condition is false the command is skipped.
The Open Transaction command has no options. However, the Revert Transaction command does have options. The Revert Transaction command allows you to test the environment and provide the conditions under which you will abandon the transaction.
The transaction commands can be nested within If / Else / End If blocks. Its important to remember that the Open Transaction and Commit Transaction commands are paired with one another and form a control block. You cannot use the Commit Transaction command by itself.
The script interpreter will throw up warnings if you try to code like this.
Open Transaction
Show Custom Dialog["Save this Order?"]
If [ Get(LastMessageChoice) = 2 ]
    Revert Transaction[]
Else
    Commit Transaction
End If
However, it is possible to nest the Revert Transaction command within an If block. This sort of pattern will be used in many different situations. When using this pattern you must remember that Revert Transaction will behave like Exit Loop If. It takes you immediately to the end of the transaction block, skipping all other script steps.
Open Transaction
Show Custom Dialog["Save this Order?"]
If [ Get(LastMessageChoice) = 2]
    Revert Transaction[]
    beep                                # will be skipped
    Show Custom Dialog["Reverted!"]     # will be skipped
End If
Commit Transaction
Because Revert Transaction immediately skips to the Commit Transaction command the simplest correct way to ensure that a transaction is reverted is to perform a logic test using the Revert Transaction script step.
Open Transaction
Show Custom Dialog["Save this Order?"]
Revert Transaction[Get(LastMessageChoice) = 2] # user pressed "No"
Commit Transaction
Custom Error Messages
The Revert Transaction command allows you to set an error message and and error code. If you set the error code to an integer between 5000 and 5499 an error dialog will be displayed to the user. It will show the error code and the error message. Note that this will pause the script until the user dismisses the dialog.

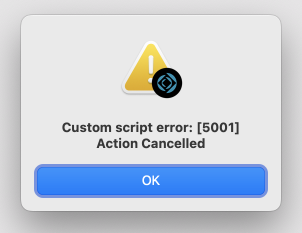
The error dialog can be supressed with Set Error Capture["On"].
If you do use the option to generate an error message it can be captured with Get(LastErrorDetail).
Great article!